Best Strategies to Declutter Your Home + Checklist and Tips
Are you ready to make some changes and start getting rid of the clutter in your life? If you said yes, then here is a foolproof strategy to help you declutter your home and organise your belongings in each room of your home.
Importance of Decluttering
Decluttering is part of self-care. Having less clutter in your life helps reduce stress not only because it removes distraction and possible mental anguish but also because decluttering helps saves you time (you have a home for everything and everything has its place). by saving you time looking for things and cutting down on needed chores, among other things.
How to Start Decluttering Your Home?
Are you convinced of the life changing magic of tidying up? As Marie Kondo, the famous founder of the KonMari decluttering movement would say, then it’s time to start. But what if you’re not sure where to start?
Often we feel overwhelmed, anxious, and defeated around just the idea of cleaning up, never mind the process of decluttering. Add to this the notion that owning less ‘stuff’ can lead us to feel a sense of loss and many of us turn our back to the important task of letting go.
The reality is much of our stuff takes up unnecessary space and time in our lives. With less stuff — and permanent homes for all the stuff we do keep and use — we have less to clean, less to sort and put away and more time to do the things we really enjoy in life.
To start, then, all you need to do is to commit to the process and begin the process. Remember, removing clutter from our lives and homes does not need to be rushed process completed in the least amount of time. Instead, break the task up into timed segments — commit to completing one task per day (or more if you are motivated). For most of us, decluttering your home and your life is a process that can and should be completed over time. The key is to make a start.
The good news about starting a decluttering process is that it does not require any fancy equipment, tools, supplies or storage containers. All you need is a strategy or a system.
To help you pick the right strategy for you, consider these five methods of decluttering. Each one is promoted and used by a professional organizer or decluttering pro — people who are trained in the methods and the psychological limits that prevent us from letting go of our stuff.
5-Bin System for Decluttering
One universal system is the 5-bin system, where each bin is assigned a purpose.
Put Away: Start in one room and put all the items you want to keep, but don’t belong in this room, into the ‘Put Away’ basket. The misplaced items could be as simple as a coffee cup that needs to go back into the kitchen or it could be an item that doesn’t, yet, have a home, such a keepsake picture your teenage son painted when he was 5-years-old. No matter the item, if you plan to keep it, put it in the Put Away bucket. Quickly put away the items that already have homes and then work at finding permanent homes for items that are currently homeless.
Recycle: This bin is for items that need to be recycled, such as paper, plastic, glass or even electronics. While it’s easier to dispose of paper, plastic and glass (just put it in their respective curb side recycling containers), you will probably need to schedule time to drop off electronics at the dump, where they are properly disposed of and recycled.
Fix/Mend: Use this container for items that need further tinkering, such as a pair of shoes that you love but which need to be cleaned, or those jeans that have a hole that needs to be mended.
Trash: This bin (or bag) is for all items that can be tossed immediately.
Donate: Designate one bin for items that you can donate to a charitable organisation or another person. These should be items you can imagine another person wanting or needing, so broken toys or ragged clothing shouldn’t end up in this bin.
Checklist System for Decluttering
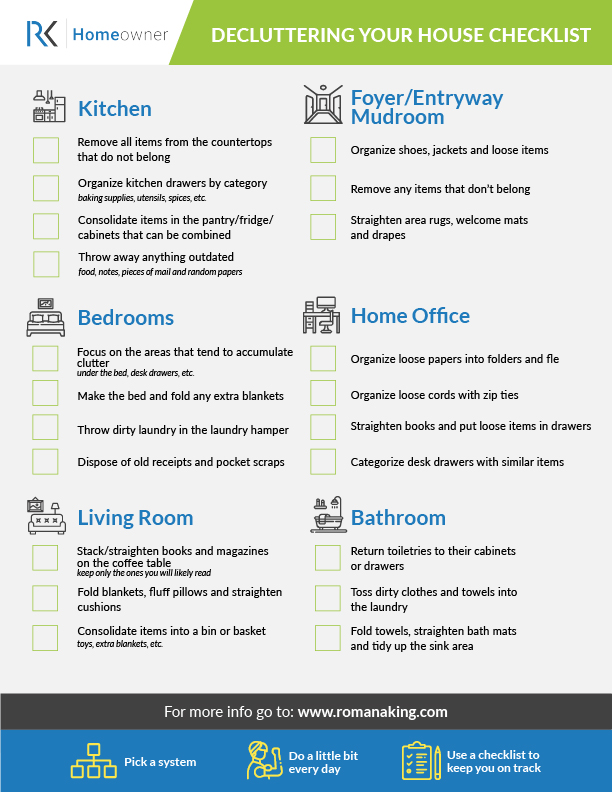
Creating a checklist is one of the easiest ways to keep track of what can and still needs to be reduced from your home, plus it helps those of us who work better with lists to plan, start and complete the process of decluttering our home.
Use the list to go from room to room and to sort and organize all items in your home. As you finish each item on the checklist, check it off. Once one room is complete, move on to the next one. Repeat until all rooms are organized and clutter-free. If things start getting messy and disorganized, print-off the checklist and start again.
The 12-12-12 Challenge
This challenge asks you to locate 12 items to throw away, 12 items to donate, and 12 items to be returned to their proper home. Do this once per day until all items in your home have a permanent spot and all trash is in the garbage. Repeat as necessary.
The KonMari Decluttering Approach
No one discussing decluttering can ignore the power and popularity of the KonMari decluttering system. Created by Marie Kondo, a Japanese organizing consultant, the system encourages you to declutter based on categories and not by rooms.
At the heart of the KonMari approach is the idea that we should only hold onto items that give us pleasure or bring us joy. (Her catch phrase is: Spark Joy.)
Using the KonMari approach, you are to tackle one category at a time — clothing, electronics, paperwork, etc. — and only keep the items that you consider important for your happiness. To make the process easier, many organizing pros have created KonMari checklists — lists that distill the main points of this decluttering system and enable you to declutter and cross-off for a deeper sense of accomplishment.
The big difference with the KonMari approach is that you are to gather all the category belongings in one place. This is key, as the collection of all this stuff in one place is a visual reminder of just how much ‘stuff’ you really own. This process also helps you determine what is actually important for your happiness and well-being and what you can realistically let go of to help declutter your life and your home.
Which leads to the next step: Ruthlessly let go. Don’t hold back with “just-in-case” or “maybe” items. If it doesn’t spark joy, it’s got to go. Then find homes for all like items. All towels are to be stored in one place (not in various places all over the house); all batteries in one place; all pencils in one place, and so on.
Finally, create homes for all these items using the ‘use of space’ method not the frequency of use. That means all bathroom items are stored together, even if you only use that curling iron twice per year.
The KonMari system works. Despite purging boxes and boxes before our cross-country move, I was still able to donate five large garage bags full of clothing and gently used items using the KonMari approach. And I’ve never missed the items that no longer live in our home!
Room-by-Room Declutter Approach
Decluttering your home can seem like an intimidating task, especially when all you see is one, big, messy house. To get you motivated, consider breaking down the task into smaller jobs. One easy way to do this is to tackle each room, on its own. One tip, though, don’t start this process with either your bedroom or your office. Quite often, the most difficult rooms to declutter are bedrooms and office space, because they have a lot of storage space and things start to pile up in both of these rooms. Instead, start with other rooms in the home and, after feeling the accomplishment of decluttering and organizing these rooms, tackle the tougher rooms, like bedrooms and office, with more confidence and skill.
Here are some tips for each room:
How to Declutter Your Bathroom
To start simple and build up momentum, start with your bathroom. A good place to start this process is in your medicine cabinet. Take everything out and discard outdated medications, makeup, and skincare products. Put everything you’re keeping immediately back into the cabinet and be sure to store the items you use most at eye level with items used less often on other shelves.
Next move to vanity drawers, cupboards and counter. Again, remove everything, do a quick evaluation of what you’re keeping and what you’re tossing. Put the items you’re going to keep back into their drawers or into the cabinet (perhaps using baskets to keep things organised). Be sure to keep the most often-used items closest to the doors or in the top drawers. For your countertop, only keep the absolutely necessary items on the surface. This should include no more than soap for washing hands and perhaps your toothbrush — but it’s best to find a better place for even that, if possible.
Now, apply the same routine with your shower and/or bathtub. The idea is to remove, discard or organize all items in the bathroom. Use baskets to corral similar or same items and remove all extraneous items that don’t have a purpose from this room.
The Entryway, Mudroom, and Foyer
Whether you have a grand mudroom, a small foyer or a makeshift entryway, you will need to ruthlessly and frequently declutter this space.
If the area is large enough to hold a desk, console, table or cabinet, then start here. Go through each drawer, cabinet or shelf and remove all the contents. Then make a quick decision: Keep or toss. If you are keeping the item, decide if it needs to stay in the entryway or be put back in its proper home in another part of the house. Now go over each flat surface and do the same. Once cleaned out, you want to make zones or space for the items that should be stored in the entryway. Find a spot for keys and wallets. Have hooks to hang bags and spots for jackets, hats and sweaters. Make sure everything is accessible and not too crowded. This will make it easier to leave the house with what you need each morning.
If your entryway has a closet, you’ll need to declutter this space, as well. Start with shoes and boots, then jackets, followed by accessories. Remember, first sort by deciding whether or not to keep or toss, then find a permanent home for each item. Do you really need to keep that winter down jacket in the hallway all summer long, or can this be moved to winter storage in the attic or basement?
How to Declutter Your Kitchen
Keeping your kitchen clutter-free is a real challenge because so many different activities occur in this room. From cooking to eating to socialising, the kitchen is where most people gather and spend time. As a result, the kitchen has many different types of items stored in it — and this can lead to overwhelming and very frustrating clutter.
To tackle a cluttered kitchen, break the task down into manageable steps. The first step is to decide what strategy to use: You can choose to declutter your kitchen by focusing on one category at a time, such as drinking vessels, or pots and pans, or utensils; or you can opt to go from zone to zone until your entire kitchen is clutter-free.
If you opt for the category approach, then it’s important to collect all of those items in one place, say your kitchen island or counter, and thoroughly assess: Do you need all of these items? Do you really use all these items? Chances are you have more spatulas than you really need, or more bake sheets than you actually use. Any items that are still in good shape that are no longer necessary can be donated, others can be recycled or trashed.
If you are going from zone to zone, consider tackling smaller areas first, such as the standard, kitchen junk drawer. Thoroughly empty the drawer and go through the “keep or toss” decision quickly and ruthlessly. Once complete, consider getting drawer dividers and only place specific items in each section of this drawer: Pens in one part, elastics in another, labels and sticky notes in another section.
Repeat this process for each cabinet, drawer and shelf (including those located in your fridge and freezer). Remember, a kitchen cabinet can be a great place to store food items, but it’s also a great spot to unintentionally collect unwanted cans, boxes and food items that will eventually expire. To prevent this waste and this clutter, go through each item and plan where it will be stored and when it will be used.
The final focus is on countertops. Move as many items as you can off of your kitchen counter and into storage spaces. Keep only what you use every single day on the countertops. By doing this you create a cleaner, more organized room that helps you continue the practise of putting things away.
How to Declutter Your Living Room
The living room can be a hard room to keep neat simply because it’s a high-use room that sees a lot of traffic on a daily basis. What’s worse is that most living rooms don’t come with a ton of storage space. There may be a bookshelf or a TV console, but there’s not a ton of places to ‘hide’ stuff. In a way, that’s a blessing since things don’t get tucked into places and forgotten, but it can also be hinderance.
To help contain living room clutter, consider getting baskets for items used on a regular basis, such as TV remotes, magazines and books. Once like-items are collected and in containers, remove all other items from shelves, drawers and cabinets. Once again decide whether or not to keep or toss and then determine if the item requires a permanent home in the living room. Now, start to store the basket or containers with all like items on the newly cleaned shelves and cabinets.
Once done, scan the electronics. Are there gadgets you no longer use? If so, it may be time to unplug and either donate or recycle. Finally, turn to sentimental items, such as artwork, found treasure or collectibles. To help contain these items, consider vertical space storage. Install wall shelves to display your items — showcasing your special memory-minders.
How to Declutter Your Bedroom
It can be easiest to declutter your bedroom by dividing it into distinct areas that need attention. Start by decluttering any drawers. Like in other room, empty each drawer and ask: Keep or toss? If you are keeping, you need to decide if the item belongs in the bedroom or not? If it doesn’t belong in the bedroom, put it in the “Put Away” basket. At the end of the process, you’ll have a basket of items that need to be put away in their respective homes in other rooms.
When deciding whether or not to keep something consider whether or not you’ve used or worn it in the past year. If not, get rid of them. Then, clear the flat surfaces in the room and replace only the most important items, like lamps or an alarm clock.
When you are done, everything in your bedroom should have a ‘home’ including pens, notebooks, phone chargers and books.
Repeat this process until all drawers, shelves and flat surfaces have been decluttered.
Closet and Clothing
Now, it’s time to tackle your closet . The easiest way to declutter a closet is to first declutter your clothing by type. If you keep shoes in your bedroom, start with this item. Go through all shoes, then boots and answer: Keep or toss? Then go through each type of clothing: dresses, slacks, jeans, t-shirts, long-sleeves, sweaters, even under garments.
The reason why this works is that it’s much easier to decide whether or not to toss something, if you see it amongst similar items. That pair of jeans you rarely wear isn’t so important if you see it among other jeans you love to wear.
Go through all clothing and shoe types and decide what to keep, repair, donate and toss. It’s also easier to process and complete each clothing type when you see each of the four piles in front of you:
- Keep items: Put these away ASAP.
- Repair items: Put these in a home for items to repair, and be sure to tackle this task.
- Donate items: Put these in your bin for donations and schedule a time to drop the bin off at your local thrift store.
- Toss items: Throw these items out, immediately.
For more tips on decluttering your closet, check out Redfin’s decluttering article.
How to Declutter Your Office
Your office is probably where most of the paper clutter in your home comes from. To start decluttering, sort your documents into piles based on what kind of attention they require — immediate, important but in the future, important but in the past, or junk. You may want to add a sentimental pile.
Now find a permanent spot for each pile and put each pile away. Keep immediate (or urgent) close at hand, while other piles can be filed away. Once done, you’ll want to implement a “touch it once” rule — as soon as you get the mail, don’t look at it then drop it in a pile, look at it and then immediately file in the proper pile/paper-home. That way, you won’t build up a lot of paper clutter — and you’ll make sure to stay on top of your responsibilities.
Decluttering Tips
To get you motivated to get rid of your clutter, consider these four tips for sorting your stuff:
- Write a must-have list.
Actually sit down and write a list of all the items you love and can’t live without.
In this first step, it’s important you don’t walk around your house listing items. The purpose is to really allow your mind to settle on those items that are most important. If you can remember it, and it’s important to you, then put it on the list.
- Set a three month deadline.
Setting goals and deadlines keeps us on track. By setting a three month deadline you leave yourself enough time to accomplish the task of decluttering without feeling pressured or rushed. Remember, this is about eliminating stress in our lives!
- Sort into piles.
You’ll never make your three month deadline if you leave the sorting to the last minute, so commit to setting aside time each day to organise your belongings. And don’t get stuck on the notion that you actually have to make piles. If you don’t like the idea of stuff piling up, consider dedicating a room to the sorting, or use plastic bins, or sticky notes. The idea is to sort all your items into categories: Keep, Sell, and Charity.
If the task seems daunting, start in a room that will have fewer emotional attachments, such as the kitchen. For instance, you probably won’t get teary-eyed over donating a spatula (or two, or three!) or a set of mixing bowls. Once you make a start it will be easier to move on to other areas of the house.
The rules change a little bit when it comes to tackling paper. Considered ‘Enemy #1’ paper can often overwhelm the best of intentions. Rather than tackle an entire stack, consider doing a little bit each day. By setting a time limit, say one or two hours you limit your exposure to the overwhelming task of sorting through papers. Also, don’t create new piles. Instead, find homes. Sort out all important documents and file them accordingly either in folders or hole-punched in binders. That means every time you pick up a piece of paper you should decide exactly where it needs to go: in the garbage, in a binder or file folder, or the “deal with it now” pile.
By the end of three months every item in your home should be allocated to one of three categories: Keep, sell or charity.
- Sell it. Donate it. Get rid of it.
Now you can start the process of actually disposing of your items. If you’d like to make a few bucks, consider throwing a yard-sale, or sell your items online through Craigslist.org or Kijiji.ca (keep posted for tips on how to hold a successful yard sale). If you don’t relish the idea of piece-by-piece sales, consider calling in an online auction company, such as Maxsold. These estate auctions allow people to bid online for your unwanted items, and then all sold items are picked up on a pre-scheduled day.
If you hate the idea of strangers rummaging through your items then consider donating both the charity and the sell piles. Most charities accept drop off donations, but a few will also schedule donation pick-ups. For instance, the Ontario Federation of Cerebral Palsy will pick-up and drop-off your donations to local Value Village stores. The store then pays the charity a cash donation for the items. If you do decide to go this route, don’t wait until the last minute to phone and schedule a pick-up, since many of these organisations only pick-up donations once or twice a month. Also, make sure you ask the charity how your donations should be sorted. My husband and I were caught off-guard when a driver for our local Diabetes Association refused to enter our home to pick-up the furniture we were donating. Apparently, the dispatcher had neglected to tell us that all items had to be left on the curb.
If you end up feeling overwhelmed don’t be tempted to just move everything to a storage locker. A bedroom-sized storage locker will set you back $150 or more each month—a cost that can really add up. Remember the goal is to declutter and de-stress.
Tips for Cleaning While Decluttering
- Keep a damp rag to wipe up any dust bunnies.
- Resist the urge to vacuum as you go. Finish the decluttering, first, then pull out the vacuum.
- Where appropriate, keep a small trash or recycling bin in each room to encourage tossing items right away.
- Keep seasonal items (sports gear, winter wear, grilling tools.) all in one spot, say the attic or a basement, in clearly marked bins. Label the bins so you know exactly what is in each box.
- Buy a labeller or use blank labels and a marker. When things have a proper home, you are more likely to put them away.
How to Find a Professional Organiser Near Me
If you don’t feel up to the task of decluttering, consider hiring a professional organiser to help. These professionals specialise in decluttering spaces, and they will adapt their services to your specific needs.
Start by defining some goals for your decluttering project: Do you want to totally overhaul your large home, for instance, or are you interested in decluttering a few smaller spaces? Setting goals like this will help you find an organiser who suits your needs.
Next, do your research. Look up organisers near you and pay attention to how previous customers have rated their services. Asking for a referral from a friend is also a great way to find the perfect hire, because you can trust their recommendation and learn about exactly how an organiser worked out for them.

